Peacock AE ExpressionMeister
Table of Contents
History
Maybe you have a similar problem with expressions in After Effects like me. I used to work as a motion graphics designer for a tv station and my task was to create many little motion graphics movies per day. I found myself using the same techiniques over and over again like for example creating a simple in animation for all the icons and pictorgrams etc.
As I’ve got more into expressions I figured that I could make my life much more easier by having a nice collection of little expression that would save me some mouse clicks per day. Of course my collection of expressions were saved somewhere on my computer in a .txt file and it was kind of a pain to always skim through the finder and find the expression I was looking for.
The first script I created to help myself with this dilemma was just a small panel with a button to insert the one and only scaling expression that me and my colleagues were using the most. After one of my colleagues came to me and told me that my little script was so helpful and that he was using it everyday, I collected some more feedback and started developing a script that would satisfy all needs of my colleagues and me.
During the development process I thought a lot about how I can make this script as flexible and useful for as many people as possible and I came up with the Expression Meister.
Installation
- Copy the script
Peacock AE ExpressionMeister.jsxbinto one or both of the following locations:
Mac:
/Applications/Adobe After Effects CC [VERSION]/ScriptsMac:
/Applications/Adobe After Effects CC [VERSION]/Scripts/ScriptUI PanelsWin:
C:\Program Files\Adobe\Adobe After Effects CC [VERSION]\Support Files\ScriptsWin:
C:\Program Files\Adobe\Adobe After Effects CC [VERSION]\Support Files\Scripts/ScriptUI PanelsNote
If you’re installing the ExpressionMeister on windows and have multiple versions of After Effects installed you might skim through all versions and find the one script folder where all scripts are installed. On my windows 10 machine all AE versions were sharing the Support Files folder from the AE version that was installed first.
- Copy the
Peacock ESTK Libraryfolder into one of the following locations were [1] is prioritized.
- [1] Mac:
~/Library/Application Support/- [2] Mac:
/Library/Application Support/- [1] Win:
~\AppData\Roaming\- [2] Win:
C:\ProgramData\
- After restarting After Effects the script is ready to be executed and appears here:
- Script as window:
After Effects -> File Tab -> Scripts -> ...- Script as ui panel:
After Effects -> Windows Tab -> ...
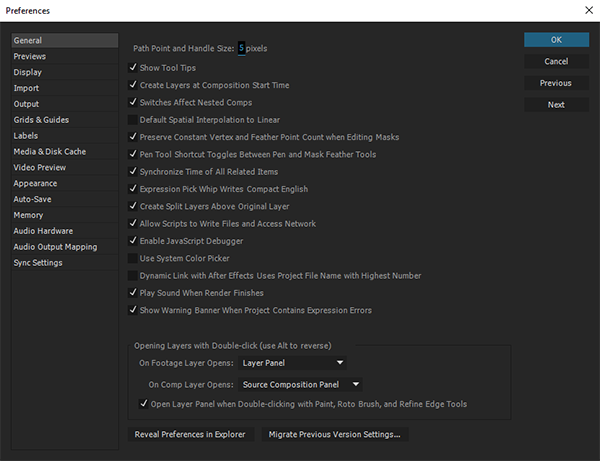
- Go to the After Effects preferences and check the option:
After Effects -> Preferences -> General -> Allow Scripts To Write Files And Access Network
Getting Started
Tutorial 1 - Apply Expressions
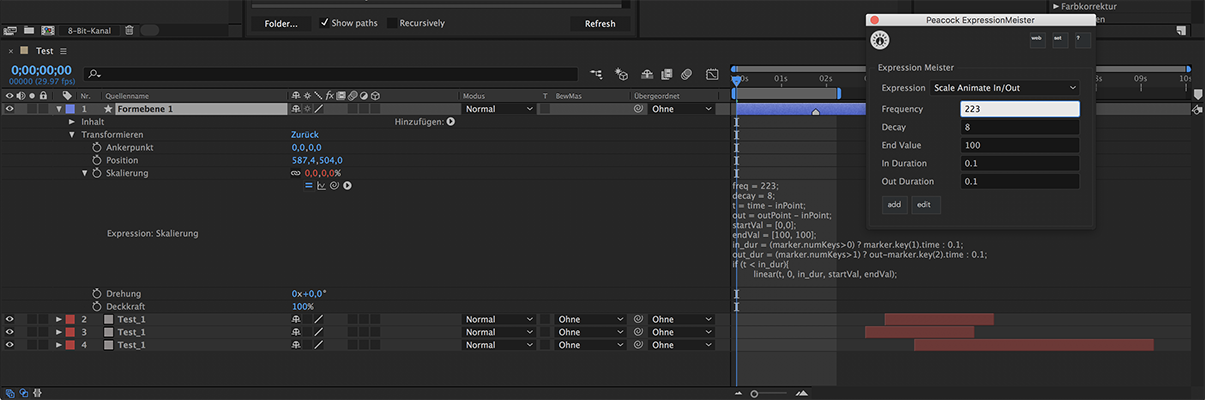
- Open the ExpressionMeister either from the File menu as a window or from the Windows menu as a panel.
- Select one or multiple layers in the active composition and press the Add Expression Button.
- With the layers still selected press the key
etwice very quickly and the property with the previous added expression gets revealed. - Expand the property so that you can see the whole expression.
- Now type in some values into the ExpressionMeisters Input Fields and see how the expression is updating while you are typing.
Tutorial 2 - Edit an Expression 1
- Click the Edit Expression Button in the ExpressionMeister and see how the Edit Expression Window opens up.
- Change the input fields with the label
namedescriptionon the top of the window and all the input fields with the labelName @#on the bottom of the window. - Close the Edit Expression Window and see how your changes take effect on the ExpressionMeisters main window.
- Now you’ve successfully modified the active expression and all changes were saved to the
expressions.jsonfile that is located in:
- Win:
C:\Users\(User_Name)\Documents\Peacock ExpressionMeister\expressions.json- Mac:
~/documents/Peacock ExpressionMeister/expressions.jsonNote
For more information about ExpressionMeister preferences see Preferences
Tutorial 3 - Edit an Expression 2
The next step is to actually edit the expression code itself.
Open the Edit Expression Window.
Notice how the input field that contains the actual expression code includes multiple occurences of the character
@, for example:freq = @1; decay = @2; t = time - inPoint; out = outPoint - inPoint; startVal = [0,0]; endVal = [@3, @3]; ... more code
Now add another line
myValue = @4;to the expression right afterendVal = [@3, @3];so that it looks like this:freq = @1; decay = @2; t = time - inPoint; out = outPoint - inPoint; startVal = [0,0]; endVal = [@3, @3]; myValue = @4; ... more code
Note how while you are adding another
@character, an additional row of input fields, on the bottom of the window appears, with the labelsname @4,value @4anddefault @4.Fill out this newly created row and close the Edit Expression Window.
Follow the steps of Tutorial 1 - Apply Expressions and see how changing your newly created
myValueproperty of the expression updates while you’re changing it in the Expression Meister.
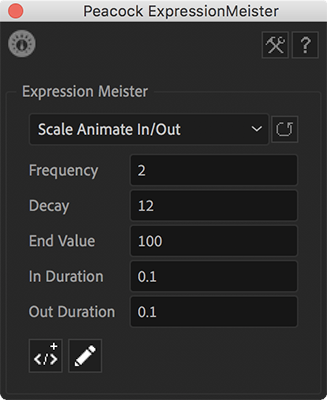
Main Window
Header Section
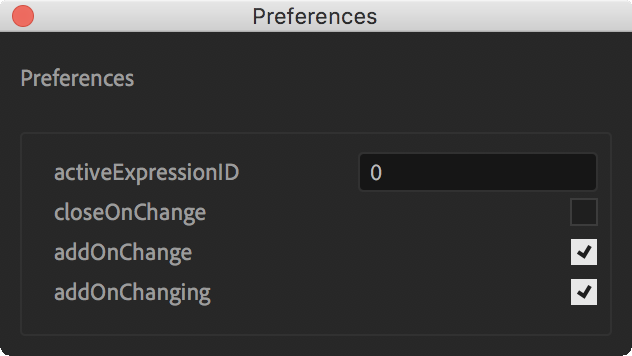
Preferences
Left ClickOpens a new window to quickly edit the settings from the preferences.json file in the following location:
- Mac:
~/Documents/Peacock ExpressionMeister/preferences.json - Win:
C:\Users\USERNAME\Documents\Peacock ExpressionMeister\preferences.json
- Mac:
Right Click- Reveals the preferences folder in the systems file explorer.

Expression Dropdown
Select the expression you want to be active.
If you move the mouse over the dropdown list and wait a second you can read the description of the active expression in a small tooltip.
Note
You can remove an expression by holding down the meta key while selecting the expression in the dropdown list.
Revert to Defaults
Reverts the values of the active expression to the default values you specified for the expression.
Input Fields
A list of all properties that you defined for the active expression.
If you want to change one of the following please refer to the Edit Expressions Window section for further instructions.
- Edit the labels of the input fields.
- Edit the default values of the input fields.
- Add or remove input fields.
Note
You can jump from one input field to the next by pressing the tab key. If you press tab while holding down shift you will jump to the previous input field.
Note
You can revert the values of all input fields by clicking the Revert to Defaults button.
Edit Expression Button
Opens the Edit Expressions Window.
Please refer to the Edit Expressions Window section for further instructions.
Add Expression Button
Adds an expression to all selected layers.
The property that the expression is applied to, is defined for each expression individually.
You can change the target property in the Edit Expression Window.
If the target property is set to Selected Property you need to select your desired property before you can add the active expression.
Edit Expression Window

Expression Name
Editing the name will set the name of the expression that is active in the current Edit Expression Window and save the changes to the expressions.json file.
Expression Description
Editing the description will set the description of the expression that is active in the current Edit Expression Window and save the changes to the expressions.json file.
The description of the modified expression is displayed when:
- you hover over the Expression Dropdown and the modified expression is selected.
- you open the Help with
left click.
Expression Property
Editing the property selection will set the target property of the expression that is active in the current Edit Expression Window and save the changes to the expressions.json file.
Please refer to the Preferences section to learn more about how to add custom properties to the properties.json file.
The default properties are defined in the properties.json file:
- Anchor Point
- Position
- Scale
- Rotation Z
- Opacity
- x Position
- y Position
- Selected Property
Expression Editor
While you are typing expression code into the editor it is checked
If the editor notices that a new @ character was added to the expression code, the Expression Property Table gets updated so that the number of rows reflect the occurrences of @ characters that have not the same number.
If the editor has keyboard focus the following keyboard shortcuts are available:
Meta+Enter- Confirm changes to the editor and close it if the Close on Apply Checkbox is checked.
Control+7- Comment all selected lines from the code.
Meta+sorControl+6- Save changes.
Note
Note that if you press Meta + s After Effects will also save the project.
Expression Property Table
The number of rows in the Expression Property Table reflects exactly the occurrences of all @ characters in the Expression Editor that have not the same number.
Each row is assigned to all @ characters that have the same number applied as the related row.
Assuming we have the following expression code in the Expression Editor, the number of rows in the Expression Property Table would be 4:
freq = @1;
decay = @2;
endVal = [@3, @3];
myValue = @4;
If we would add another @1 or @2 to the expression the number of rows would stay the same.
If we would add a @5 then an additional row is added to the Expression Property Table.
Apply Button
All changes that were made are getting saved.
If the Close on Apply Checkbox is checked the Edit Expression Window closes after clicking the this button automatically.
Note
Actually all changes are getting saved immidiately after any field was modified. This button is more or less to satisfy some who like to press buttons ;-)
Close on Apply Checkbox
If checked the Edit Expression Window closes after clicking the Apply Button automatically.
Preferences
The preference files for the Expression Meister are stored in the user documents folder in a folder named Peacock ExpressionMeister:
- Win:
C:\Users\(User_Name)\Documents\Peacock ExpressionMeister- Mac:
~/documents/Peacock ExpressionMeister
~/documents/Peacock ExpressionMeister
The preferences are split into three files which brings some advantages to the user.
- You can easily backup the preferences.
- You can work on several working places by just keeping the preference files up to date.
expressions.json- The heart of ExpressionMeister that contains all expression data.
preferences.json- Some settings that takes some decisions for the ExpressionMeister.
properties.jsonYou might never change the properties.json file because the pre set properties are enough for your needs and you can always make use of the
Selected Propertyfeature from the Edit Expression Window property dropdown list.If you add more properties to this file they will show up in the Edit Expression Window as another option from the property dropdown list.
Note
For more information about After Effects matchnames of properties and effects please search the net for
after effects matchnames
The following section shows example content of all three preference files:
The
expressions.jsonfile.The following block shows only one of the ten default expressions as an example to show how an expression is saved and structured.
[
  {
    "name": "Scale Animate In/Out",
    "description": "Creates a bouncy scale in animation and fades out with a simple linear scale animation. The first marker determines the 'In Duration' if it exists. The second marker determines the 'Out Duration' if it exists.",
    "parameterNames": [
      "Frequency",
      "Decay",
      "End Value",
      "In Duration",
      "Out Duration"
    ],
    "parameterValues": [
      "2",
      "12",
      "100",
      "0.1",
      "0.1"
    ],
    "defaultParameterValues": [
      "2",
      "12",
      "100",
      "0.1",
      "0.1"
    ],
    "property": "Scale",
    "text": "freq = @1;\ndecay = @2;\nt = time - inPoint;\nout = outPoint - inPoint;\nstartVal = [0,0];\nendVal = [@3, @3];\n\nin_dur = (marker.numKeys>0) ? marker.key(1).time : @4;\nout_dur = (marker.numKeys>1) ? out-marker.key(2).time : @5;\n\n\nif (t < in_dur){\n\tlinear(t, 0, in_dur, startVal, endVal);\n}\nelse if(t > (out-out_dur)){\n\tlinear(t, (out-out_dur), out, endVal, startVal);\n}\nelse{\n\tamp = (endVal - startVal)/in_dur;\n\tw = freq*Math.PI*2;\n\tendVal + amp*(Math.sin((t-in_dur)*w)/Math.exp(decay*(t-in_dur))/w);\n}"
  }
]
The
preferences.jsonfile:{ "activeExpressionID": 0, /* Index of the expression that is loaded on startup. */ "closeOnChange": false, /* If true: the edit expression window closes after clicking the apply button. */ "addOnChange": true, /* If true: the active expression is applied if the input field loses focus, tab key was pressed or enter key. */ "addOnChanging": true /* If true: the active expression is applied while the input field is changing. */ }The
properties.jsonfile:[ { "name": "Anchor Point", "group": "ADBE Transform Group", "matchName": "ADBE Anchor Point" }, { "name": "Position", "group": "ADBE Transform Group", "matchName": "ADBE Position" }, { "name": "Scale", "group": "ADBE Transform Group", "matchName": "ADBE Scale" }, { "name": "Rotation Z", "group": "ADBE Transform Group", "matchName": "ADBE Rotate Z" }, { "name": "Opacity", "group": "ADBE Transform Group", "matchName": "ADBE Opacity" }, { "name": "x Position", "group": "ADBE Transform Group", "matchName": "ADBE Position_0" }, { "name": "y Position", "group": "ADBE Transform Group", "matchName": "ADBE Position_1" } ]
Troubleshooting
Warning
If you wonder why ExpressionMeister doesn’t create the required preference files or doesn’t even launch, than it is probably because ExpressionMeister needs access to the filesystem. Please change After Effects preferences accordingly:
After Effects -> Preferences -> General -> Allow Scripts To Write Files And Access Network (Skripte können Dateien schreiben und haben Netwerkzugang)