Peacock PPRO BpmSlicer
Premiere Pro BpmSlicer.
A manual for the Premiere Pro extension
This extension is designed for creatively making music videos by developing a special midiclip along with your music production that helps you later in the video editing process.
Primarily this extension is made for music producers who are familiar with midi and the bpm value of a song.
Nevertheless you are not into music production and don’t know how to create midiclips you can still use the other functionallity of this extension.
But you need to take a deeper look at the Preparations.
Here you can find the Premiere Scripting Guide.
Table of Contents
Installation
Download the extension (.zxp file)
When you download the extension, it comes as a zxp file to your computer’s Downloads folder. Enter any passwords, or accept any notices your computer’s operating system presents.
Extension Install Utility
If you were unable to install your extension using the Creative Cloud desktop app, please follow the instructions below to use an extension install utility. In addition to Adobe’s Manage Extensions utility there are various third party utilites available that work with Adobe .zxp files, such as Anastasiy’s Extension Manager or ZXPInstaller.
Open the Extension Install Utility. If you don’t have it on your computer, below are download links for alternative utilities. Once downloaded and installed, use an extension install utility to install your .zxp files.
- Manage Extensions utility
- Anastasiy’s Extension Manager
- ZXPInstaller
After selecting either the Mac or Windows version of your chosen Extension Install Utility, download it to your computer and follow the installation instructions from the installer, which should be in your Downloads folder.
Install your extension from Adobe Exchange by selecting File > Install extension or following the instructions within the install utility and selecting the extension from within your computer’s Downloads folder.
Do not use Adobe Extension Manager for CC2015 or later compatible Adobe apps. It is no longer supported and may create install issues. Use a third party utility for extension installation, such as those mentioned above for installation, if installation via the Creative Cloud desktop app is not successful.
ExMan Command Line Tool
You can even go a step further and use the command line tool ExManCmd.
- Copy the ZXP package to ExMan_root. Let’s call it myextension.zxp.
- Close any Adobe applications that are compatible with the Extension.
- In a command shell (Mac OS Terminal or Windows Command Prompt), go to the ExMan_root folder and run this command for your extension:
In Mac OS:
./Contents/MacOS/ExManCmd ––install myextension.zxpIn Windows:
ExManCmd.exe /install myextension.zxpNote
Currently, ExManCmd does not support encrypted extensions for enterprise use cases.
- Check Where to Find it - Follow the instructions in the “Where to find it” section on the detail page. Some extensions may require you to carry out further steps to install.
This should install the add-on. You can verify the installation with this command:
- In Mac OS:
./Contents/MacOS/ExManCmd ––list all - In Windows:
ExManCmd.exe /list all
Where to Find it
After the installation you can find the extension placed in the extension folder.
- Windows:
C:\Program Files (x86)\Common Files\Adobe\CEP\extensions - Mac:
/Library/Application Support/Adobe/CEP/extensions
Resources:
Preparations
Before you can take full advantage of the functionality of the BpmSlicer you need to prepare your footage as follows.
Song preparation
You have to ensure that the following two conditions are met:
- You need to know the exact bpm value of the song you want to work with and set this value in the Bpm input field.
- You need to make sure that the 1 beat of the song sits exactly at the 0 point in time.
Some songs may not have an intro that fits the bpm rate of the actual song, then you need to find the first beat and place it accordingly.
If you have the exact bpm rate of the song then it won’t be too difficult to make it fit.
Preparing the midi clip
The best way to create a midi clip for the BpmSlicer is to have in mind what will happen later in Premiere Pro with it. Basically what we are trying here is to convert a midi note to a video clip. The following table shows the mapping of the midi properties to the properties of the video clip.
| Midi Note | Video Clip |
|---|---|
track |
The prefix that determines which footage can be used for the clip. |
noteOn |
The clips in point in the active sequence. |
noteOff |
The clips out point in the active sequence. |
velocity |
A value between 0.0 - 1.0 sets the start time of the current clip. |
While noteOn and noteOff is self explaining track needs a little more detailed explanation.
The velocity is exponentially interpreted which means it is easier to make tiny adjustment (Exponent is 3).
You can control the track property in the midi file by adjusting the midi note value of the midi note (Possible midi note values would be for example C3, D4, A#4 etc.).
Because I figured you only need a hand full of tracks in video production, I specified a range of midi note values in order to set the corresponding track.
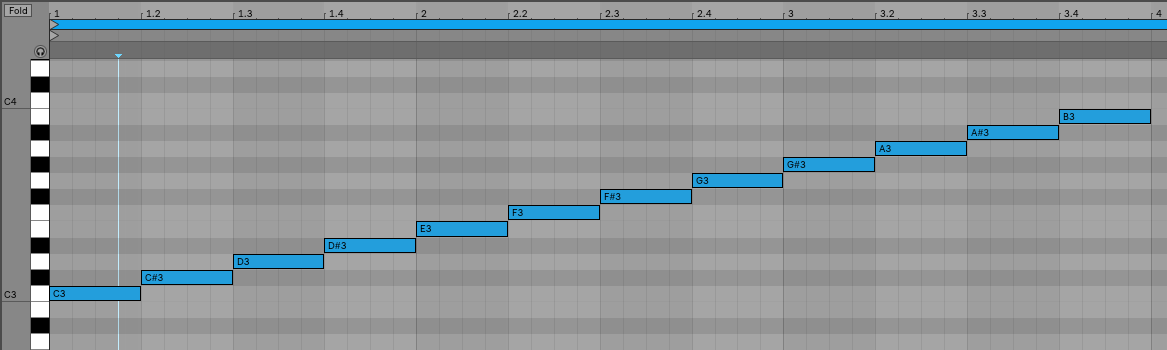
Midinote range that will set the track property to other than 0.
| Midi Note | Track |
|---|---|
| … | 0 |
| B2 | 0 |
C3 |
1 |
C#3 |
2 |
D3 |
3 |
| … | … |
A#3 |
11 |
B3 |
12 |
| C4 | 0 |
| … | 0 |
Midi Modulations
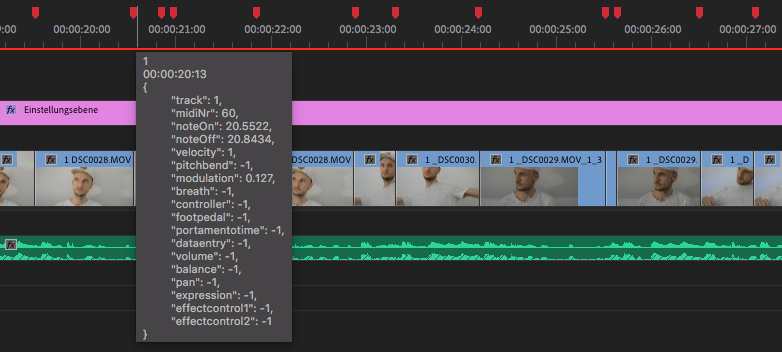
Modulations are also included in a midi file and can be accessed to manipulate video clips.
If any of the envelopes in the list below are set in the midi file, they are available in Premiere Pro. Note that not every envelope has a function yet.
The modulation evelopes in the midi file so as the velocity of a midi note have values between 0 - 127. In Premiere Pro these values are getting mapped to a value range of 0.0 - 1.0.
The following list shows all available midi envelopes including the velocity with a description about how they are used. Entries that have no description are not mapped to any function in Premiere Pro yet.
Note
If the value of an envelope event in the midifile is 63 it is getting mapped to 0.5 which is exactly the center point. This is important when you use the pitch bend in order to control the scaling where 0.5 (63) is exactly 100% which probably is your default scaling value you want to use.
This also applies to the controller and footpedal envelopes that are getting mapped to the x- and y-Position.
velocitySets the opacity of the current clip:
opacity = velocity * 100
pitch bendSets the scale of the current clip:
scale = pitchbend * 200
1 modulationSets the start time of the current clip:
startTime = map(modulation, 0.0, 1.0, 0.0, (footage_duration - note_duration))
2 breathSets the rotation of the current clip:
rotation = breath * 360
3 controllerSets the x position of the current clip:
xPosition = controller
4 footpedalSets the y position of the current clip:
yPosition = footpedal
5 portamento timeSets the x anchor of the current clip:
xAnchor = portamentotime
6 data entrySets the y anchor of the current clip:
yAnchor = dataentry
7 volumeNot set yet:
.8 balanceNot set yet:
.9 controllerNot set yet:
.10 panNot set yet:
.11 expressionNot set yet:
.12 effect control 1Not set yet:
.13 effect control 2Not set yet:
.
Note
footage_durationis the duration of the original video file.note_durationis the duration of the current midi note.
Preparing your footage in Premiere Pro
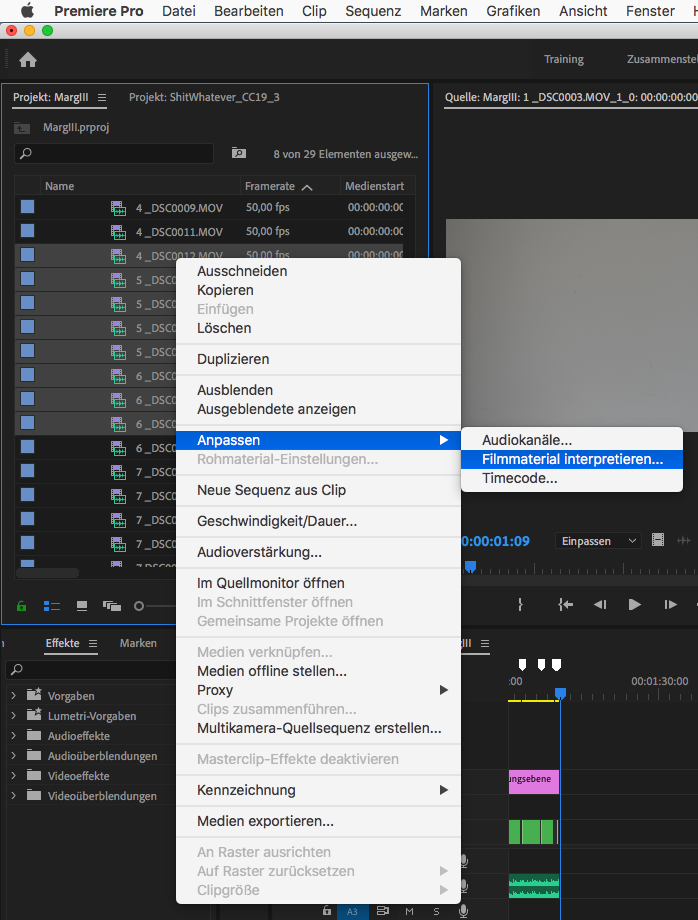
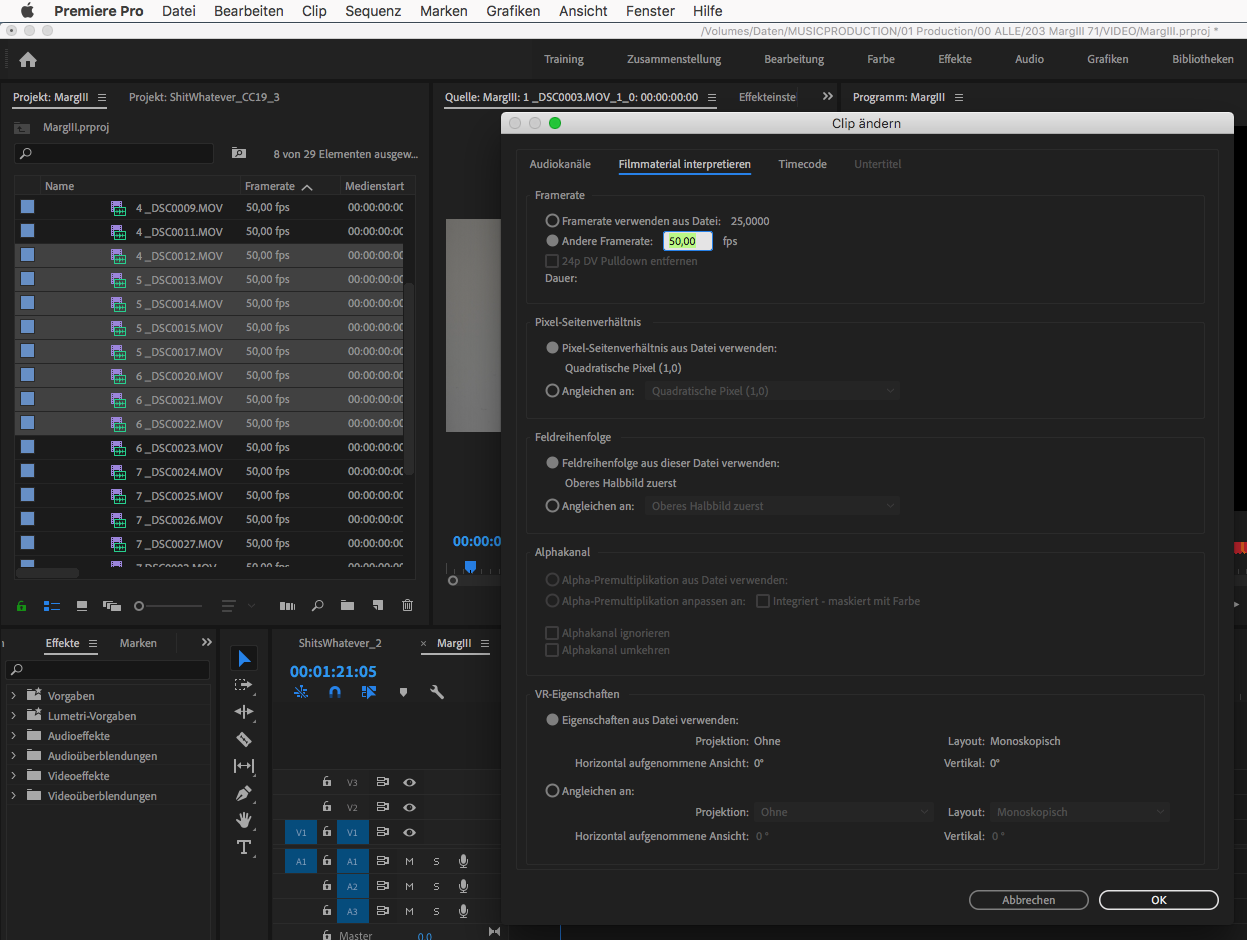
If you want to adjust the speed of your footage you can do so by adjusting the footage interpretation. Note that if you adjust the speed of the footage the BpmSlicer can not interpret the footage correctly.
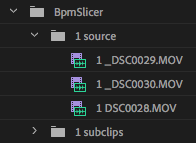
If there is no BpmSlicer folder structure already you can create one by clicking the Create Folder Structure Button:
BpmSlicer
    1 source
    2 subclips
Put all your footage you want to be placed into the active sequence
into the 1 source folder and assign the appropriate prefix for each footage item.
Make sure the prefix is a number between 1 - 12 and make sure there is a white space between the prefix number and the footage name.
Lets assume you have named your footage in the 1 source folder as displayed below:
1 source
  1 clip_1.mov
  1 video_10.mp4
  2 myMovie.mov
  2 IMG_6211.m4v
  2 VID_20190613_120613.3gp
  2 5DM35478.MOV
  3 5DM35479.MOV
  4 5DM35480.MOV
  5 5DM35481.MOV
  6 5DM35482.MOV
  7 5DM35483.MOV
  8 5DM35484.MOV
  9 5DM35485.MOV
  10 5DM35486.MOV
  11 5DM35487.MOV
  12 5DM35487.MOV
  IMG_6212.m4v      ->  (will be omited)
  IMG_6213.m4v      ->  (will be omited)
  IMG_6214.m4v      ->  (will be omited)
Everytime the BpmSlicer requires a footage item from the 1 source folder, it will look for a random item that has the track value of the current midi note as a prefix assigned.
Note
Footage items in the 1 source folder, that have no prefix assigned will be omitted.
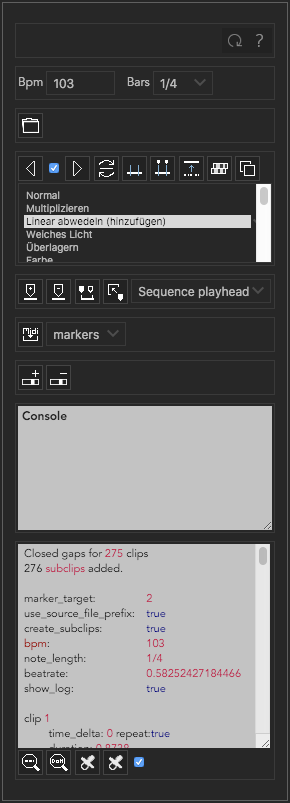
Functionality
Bars
Set bars in order to determine how many markers are created when creating markers.
The bars value is used for three different purposes:
- determine how many markers are added to the active sequence when using the ‘Add Markers’ tool.
- determine the time all selected clips are getting moved when using the ‘Move Forth’ & ‘Move Back’ tool.
- determine the time threshold where fast clip sequences get repeated when using the ‘Create Subclips’ tool.
Clips
Move Clips with Markers Checkbox
If ‘Move Clips with Markers’ is enabled all selected layers are getting moved to the left or right so that each clip fits exactly into the space between adjacent markers.
Close Gaps between Clips
The end point of each video clip is moved to the start point of the next video clip.
Randomize Selection
Actually this is a randomized deselector.
You make a selection of clips and/or transitions and this function randomly deselct items from your selection.
Change Blendmode
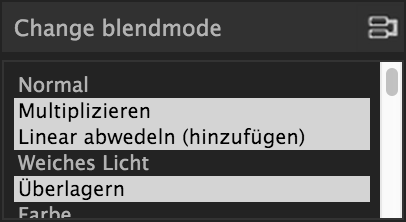
Change blendmode
You can select one or more blendmodes and apply them to the selected clips in the active sequence.
In order to select multiple blendmodes hold down [Option] or [Shift] key.
If you have more then one blendmodes selected, a random blendmode out of your blendmode selection is assigned to the selection of clips in your active sequence.
Markers
Add Markers
The markers are either added to the sequence or to a clip depending on the selection in the right hand side dropdown list.
- If the Marker target selection is ‘Sequence’
There are two ways to create markers with the adjusted bpm- and bars-value:
- If one clip is selected the markers will be placed in the range of the clips in and out point.
- If there are more then one clips selected, the minimum in point and the maximum out point is considered.
If the in and outpoints of the sequence are set and no clip is selected, then the markers will be created inside the time range of the sequences in and out points.
- If the Marker target selection is ‘Clip’
In order to create markers on one or more clips you need to place the clips into the
1 sourcefolder and give them the prefix ‘0 ‘ (e.g.0 video.mov).If you then press the
Add markersbutton, clip markers will be created according to the adjustedBpmandBarsvalue for the duration of the whole clip.
Marker Target Selection
Choose the target where the marker actions are getting applied. See Add markers for more information.
Quantize Sequence Markers
The sequence markers of the active sequence will be quantized to the sequences framerate.
Export Frames for Markers
Exports PNG images for each frame a marker is placed.
Import Midi
The midi data you want to import may either be available as a .mid or as a .txt file.
In the file open dialog you can choose either of those file formats and it is been taking care intenally to import those correctly.
If the file name contains a bpm value like bpm103, bpm_103.2, bpm-103 or bpm 103.7
it is used instead of the currently set bpm value from the BpmSlicer. You can use a . to use floating point bpm values, but you can’t use ,.
- .mid
Before you import a midi file please refer to the chapter Preparations and make sure all conditions are met.
Interprets all midi notes (previously only notes in the range of C3 - B3 were considered but that has changed in the new version):
midi_notes = {
  bpm:bpm,
  notes: [
    { track:track, midiNr:midiNr, noteOn:noteOn, noteOff:noteOff, velocity:velocity },
    { track:track, midiNr:midiNr, noteOn:noteOn, noteOff:noteOff, velocity:velocity }
  ]
}
Note
Note that the
trackattribute of each note is by default 0 and only contains other track numbers if the note is in the range C3 - B3:- C3 -> 1 - C#3 -> 2 - ... - B3 -> 12
- .txt
- Such a .txt file that contains midi note information was previously created by the external application `Midiconverter (external)`_.
See Midi Target Selection for information about what happens next.
Midi Target Selection
After the midi note data was successfully imported the options of this dropdown list decide what happens next.
- Markers
- Creates a marker for each note-on event in the active sequence.
- Subclips
- Creates a new subclip for each marker in the sequence.
- Adjusts the inpoint, outpoint of the subclip.
- Sets the starttime of the subclip randomly (Create Subclips).
- Moves the subclip into the
1 subclipsfolder. - Places the subclip onto the appropriate videotrack of the active sequence.
Create Subclips
This function considers all markers in the active sequence and places clips from
the 1 source folder onto videotrack 1.
All markers have a track property assigned, that was added during the midi import process.
The track property determines which footage items from the 1 source folder come into consideration for the random selection.
If the track property of a marker is 1, any footage item that has the prefix 1 assigned, can become the source footage of the current clip.
Please refer to the section Preparing your footage in Premiere Pro to learn more about this topic.
The following list explains some functionalities that you can manipulate before you start this process.
- Manipulate the Start Time of a Clip
- The starttime of the subclip is determined by the midi envelope
1 modulation. Please refer to Midi Modulations to learn more. - Manipulate Other Properties of a Clip
opacityis controlled byvelocityscaleis controlled bypitch bendstartTimeis controlled by1 modulationrotationis controlled by2 breathxPositionis controlled by3 controlleryPositionis controlled by4 footpedalxAnchoris controlled by5 portamento timeyAnchoris controlled by6 data entry
Please refer to Midi Modulations to learn more.
- Repeat Rate
Many clips are added to the active sequence. Some clips are shorter than others and some follow each other so that they become a very fast sequence of clips.
The fact that the BpmSlicer chooses its source footage items randomly, it can happen that too many different source footage items follow each other to quickly. For such fast clip sequences we would rather use the same source footage item repeadedly.
Before a footage item from the project panel is randomly selected, accordingly to its numerical prefix, it is checked if the duration of the previous clip, that was added to the active sequence, was below the repeat rate threshold. If it was, then the same source footage is also used for the current clip.
The repeat rate is the same as the beat rate and it is calculated by the current bpm- and bars values:
60 / bpm * bars
- Show Log messages
- If the checkbox ‘Show Log’ is checked, this process displays log messages in the console.
Note
The function overwriteClip() and insertClip() are only available in Premiere Pro version 12.0 and higher. Please make sure you’re running Premiere Pro v12.0 or higher.
Remove Subclips
Removes the 1 subclips folder.
Warning
With this action you might also remove subclips that are included in a sequence you want to keep.
Troubleshooting
Troubleshooting
Error
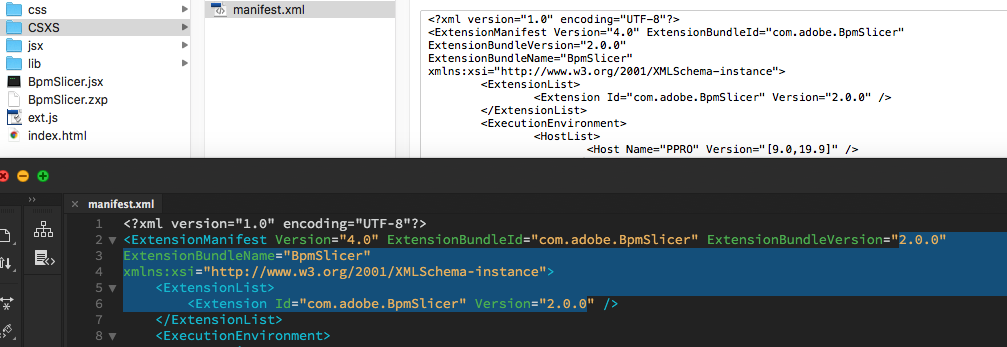
Installation failed because a newer version of the extension is installed.
Solution: Change the ExtensionBundleVersion and the Extension version in the manifest.xml to a higher number then before.
Then create a new .zxp file with ZXPSignCmd.
Note: This solution works only for the developer who has the source project files available, not if you only have the BpmSlicer.zxp file.
Error
The extension is not showing up in the extension tab in premiere pro due to a crash that was caused by the extension.
Solution: After I created a new project the problem was gone. Somehow a crash report might be saved within the project file. But before I figured that out I also made changes to the manifest.xml:
- I changed the
<RequiredRuntime Name="CSXS" Version="9.0" />from 6.0 to 9.0 - I removed the icons tag with 4 of those
<Icon Type="Normal">../css/images/PeacockLogo_20x20.png</Icon>. - I also changed the identifier from
ExtensionBundleId="com.adobe.BpmSlicer"toExtensionBundleId="com.adobe.PeacockBpmSlicer"
Other BpmSlicer data pathes
Other pathes that might help include BpmSlicer data
- Win:
C:\Users\USERNAME\AppData\Local\Temp - Mac:
/Users/USERNAME/Library/Logs/CSXS /Users/USERNAME/Library/Application Support/Adobe/Extension Manager CC/Log/ExManCoreLibrary.log/Users/USERNAME/Library/Preferences/com.Adobe.Premiere Pro.11.0.plist/Users/USERNAME/Library/Preferences/com.Adobe.Premiere Pro.12.0.plist
Development
In this section you can find some useful information about the development of a CEP HTML Extensions. Please ignore this section if you’re not a developer.
- PREMIERE PRO SDK Forum
- Premiere Scripting Guide
- CEP 8.0 HTML Extension Cookbook
-
You can bypass the check for extension signatures by editing the CSXS preference properties file, located at:
- Win: regedit >
HKEY_CURRENT_USER/Software/Adobe/CSXS.8, then add a new entry PlayerDebugMode of type “string” with the value of “1”. - Mac: In the terminal, type:
defaults write com.adobe.CSXS.8 PlayerDebugMode 1(The plist is also located at/Users/<username>/Library/Preferences/com.adobe.CSXS.8.plist)
- Win: regedit >
- Miscellaneous
Packaging and Signing Adobe Extensions
This documentation of the packaging and signing procedure is based on this pdf reference.
If you already have a certificate, you can use that. Otherwise, begin by by creating a self-signed certificate (Create a self-signed certificate):
./ZXPSignCmd -selfSignedCert US NY MyCompany MyCommonName abc123 MyCert.p12
This generates a file named
MyCert.p12in the current folder. You can use this certificate to sign your extension (Create a signed package):./ZXPSignCmd -sign myExtProject myExtension.zxp MyCert.p12 abc123
ZXPSignCmd -sign <inputDir> <outputZxp> <p12> <p12Password> [options]
| Inputs | Output |
|---|---|
inputDir |
The path to the folder containing the source files to package. |
outputZxp |
The path and file name for the ZXP package. |
p12 |
The signing certificate; see “How signing works” on page 5. |
p12Password |
The password for the certificate. |
options |
-tsa <timestampURL> The timestamp server. For example: https://timestamp.geotrust.com/tsa |
ZXPSignCmd -verify <zxp>|<extensionRootDir> [options]
| Arguments | Description | |
|---|---|---|
zxp |
The path and file name for the ZXP package. | |
extensionRootDir |
The path to the folder containing the deployed ZXP. | |
options |
|
|
|
||
|
||
ZXPSignCmd -selfSignedCert <countryCode> <stateOrProvince> <organization> <commonName> <password> <outputPath.p12> [options]
| Arguments | Description |
|---|---|
|
The certificate identifying information. |
|
The password for the new certificate. |
|
The path and file name for the new certificate. |
|
|
|
|
|
|
|